Lawn Mower Blades & Cutting Decks: The Complete 2025 Sharpening, Balancing & Replacement Guide


By Ron | Certified Small Engine Mechanic | 15+ Years Experience | Last Updated: May 2025
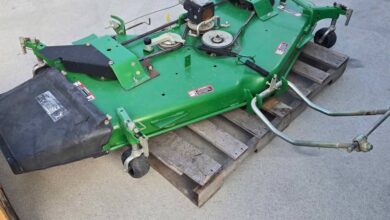
The lawn mower blade is the single component most directly responsible for cut quality – and the most neglected. A sharp, balanced blade produces a clean scissor-cut that leaves grass tips sealed against disease and moisture loss. A dull or damaged blade tears grass, creating ragged brown tips, increasing fuel consumption, and stressing your engine. This guide covers everything about blades and cutting decks: types, sharpening, balancing, deck maintenance, and spindle bearing replacement.
Chapter 1: Blade Types Explained
Standard 2-in-1 Blades (Side Discharge / Bag)
The most common blade type. A flat cutting edge with minimal lift wings. These blades are designed to cut and discharge grass clippings out the side chute or into an attached collection bag. They work well in normal mowing conditions but may struggle in very dense or wet grass, where the limited lift is insufficient to move heavy clippings efficiently.
High-Lift Blades
High-lift blades have more aggressively angled wing tips that generate stronger airflow under the deck. This increased airflow pulls grass upright for a cleaner cut, moves clippings more efficiently into the bag, and keeps the deck cleaner. Best for: bagging operations, tall fescue, and dense Bermuda grass. Drawback: higher blade RPM requirement and increased fuel consumption.
Mulching Blades
Mulching blades have a curved, wave-shaped cutting edge with additional cutting surfaces. They chop clippings into very fine pieces that fall back into the turf and decompose quickly, returning nutrients to the soil. Best for: lawns mowed frequently on a regular schedule. Mulching fails in long, wet, or thick grass – clippings become too large to mulch effectively and clump on the lawn surface.
3-in-1 Blades
A compromise between high-lift and mulching blade characteristics. They provide adequate mulching performance while maintaining reasonable bagging ability. These are the best all-around choice for homeowners who switch between mulching and bagging depending on conditions.
Gator Blades
A specialized mulching blade with serrated or notched “gator teeth” along the trailing edge that create additional cutting action as clippings recirculate under the deck. Very effective for fall leaf mulching applications and in conditions where standard mulching blades struggle.
Chapter 2: How to Identify Worn or Damaged Blades
Inspect blades before each mowing season and after any suspected impact. Remove the spark plug wire before blade inspection – always.
- Dull edge: The cutting edge should feel sharp enough to scrape your thumbnail. A blade that has been properly sharpened has a bright, thin edge visible from above. A dull blade has a rolled or rounded edge visible in bright light.
- Nicks and gouges: Small nicks (under 1/4″) can be ground out during sharpening. Large gouges (over 1/4″ deep) compromise the blade’s structural integrity – replace immediately.
- Bending or warping: Place the blade on a flat surface. Any visible rocking or gap indicates a bent blade. Never straighten a bent blade – the steel has been stressed and will crack unpredictably during operation. Replace it.
- Worn center hole: The center mounting hole of a heavily used blade can elongate over time, causing the blade to run eccentric and vibrate severely. If the hole is no longer a perfect circle, replace the blade.
Chapter 3: Sharpening – Step by Step
Tools Needed
- Angle grinder with a grinding wheel (fastest method, used by professionals)
- OR flat metal file (slower, but more controlled – good for beginners)
- Blade balancer (essential – a $5 cone balancer from any hardware store)
- Socket wrench with the correct blade bolt socket (typically 5/8″ or 3/4″)
- Breaker bar or impact wrench (blade bolts are torqued very tight)
The Process
- Disconnect the spark plug wire. This is non-negotiable. A blade that contacts the ground can inadvertently engage the engine.
- Tilt the mower (air filter side up – always tilt this direction to prevent oil from flooding the air filter and cylinder). Use a mowing deck prop or wooden block to secure it.
- Remove the blade bolt. Use a piece of wood wedged between the blade and deck to prevent rotation. Blade bolts are tightened to 70-90 ft-lbs – use a breaker bar or impact wrench.
- Sharpen at 30-35 degrees. Maintain the original bevel angle. Remove only enough material to restore the edge – typically 10-15 strokes with a file, or a few passes with a grinding wheel. Do not overheat the blade edge (it turns blue/purple if overheated). Overheating removes the metal’s temper, making the edge soft and causing it to dull rapidly.
- Balance the blade. Hang the blade horizontally on the cone balancer. The heavy end drops. Grind a small amount from the heavy end’s flat back surface (not the cutting edge) until the blade hangs level. An unbalanced blade vibrating at 3,000 RPM will destroy spindle bearings within a single mowing season.
- Reinstall and torque. Torque the blade bolt to the specification in your owner’s manual (typically 70-90 ft-lbs). An improperly torqued blade can loosen during operation – a catastrophic failure risk.
Chapter 4: Deck Maintenance
Why Deck Cleaning Matters
Grass clippings accumulate on the top surface of the deck around the spindle housings, and on the underside of the deck within the cutting chamber. On top, built-up clippings trap heat around the spindle bearings, dramatically reducing their lifespan. On the underside, thick buildup restricts airflow, reduces cutting efficiency, and adds significant weight that stresses the deck lift mechanism.
Cleaning Schedule
- After every use: Blow or scrape loose clippings off the top of the deck, especially around spindle housings.
- Weekly (or every 5 uses): Clean the underside of the deck. Many mowers have a deck wash port – connect a garden hose, run the blades at half speed for 60 seconds to flush. Alternatively, tip the mower (spark plug wire disconnected, air filter side up) and scrape accumulated material from the underside with a deck scraper or plastic putty knife.
Rust Prevention
After cleaning the underside, spray a light coat of non-stick cooking spray or a commercial deck lubricant (WD-40 Specialist Silicone or similar) on the clean deck surface. This prevents clippings from adhering to the metal and dramatically reduces cleaning effort for subsequent sessions.
Chapter 5: Spindle Bearing Replacement
Spindle bearings are the most commonly replaced deck component after blades. They support the blade shaft within the spindle housing and absorb the enormous radial forces generated by the rotating blade. Symptoms of failing spindle bearings: vibration during mowing, a rumbling or grinding noise from under the deck, and play (wobble) in the blade when pushed by hand with the engine off.
Replacement Process (General)
- Remove the blade from the spindle.
- Remove the deck belt(s) from the spindle pulley.
- Remove the spindle pulley (usually held by a single center bolt).
- Remove the spindle housing from the deck (typically 3-4 bolts).
- Press out the old bearings using an arbor press or a bolt-and-socket press technique.
- Press in new bearings (available at any bearing supply house – match the number stamped on the old bearing).
- Reassemble in reverse order, torque all fasteners to spec.
Individual bearings cost $5-$15. Complete spindle assemblies cost $25-$80 and are the easier option for non-machinists.
Chapter 6: Belt Replacement
Deck drive belts connect the engine crankshaft (via the PTO clutch) to the spindle pulleys. Belts wear through normal use and must be replaced before they fail. Signs of a worn belt: glazed (shiny) surface from slipping, cracks in the inner surface (heat checking), fraying at the edges, or a visible reduction in belt thickness. Always replace belts before they break – a belt that breaks mid-mow can whip through the deck and cause significant damage to other components.
For expert guidance on maintaining your entire mower beyond the deck, read our Mower Maintenance Master Guide and our Small Engine Troubleshooting Guide.
Conclusion
Your cutting deck and blades are where lawn care quality is actually made. Keep blades sharp, balanced, and undamaged. Keep your deck clean inside and out. Replace spindle bearings at the first sign of wear. These habits, maintained consistently, are the difference between a lawn that looks professionally cut and one that looks merely mowed.
About the Author: Ron is a certified small engine mechanic with 15+ years of professional experience in deck maintenance, blade sharpening, and spindle service for residential and commercial lawn equipment.
About the product
About the seller
Name:
Contact the seller